Page Contents 3 minute read.
So You’re Ready to Write Metadata…
If you are writing metadata for your institution’s items (Partner Model #2 and #4), you’ll be able to add metadata information after items have been scanned and uploaded into the editing system. To get an idea of what that looks like, here is an example of a record in the editing system that has only the most basic information (this is what would be uploaded if there were no super-template information):

To see a larger image, click here. (When the larger image opens, click on it to zoom.)
Step 1: The Super-Template Form
- You will fill out a Metadata Super-Template Form that includes any information that you want to have in every record.
- Keep in mind that if a large percentage of the items will have the same information, it may be more useful to put that information in every record (for example, you may have to change 20% of the records, but you won’t have to enter the same information in the other 80% if you leave it out)
Here is an example of a super-template form that contains quite a bit of information:
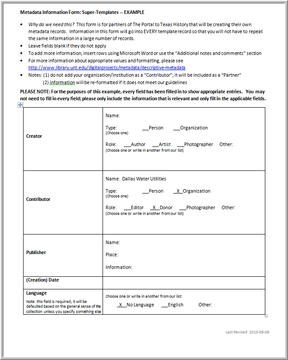
To see a larger image, click here. (When the larger image opens, click on it to zoom.)
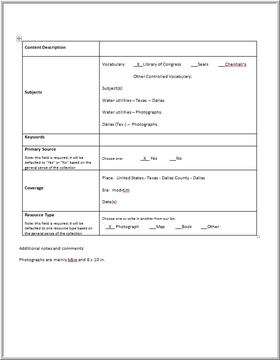
To see a larger image, click here. (When the larger image opens, click on it to zoom.)
- We will create a generic template record using the information from your form.
- When the digital images are uploaded, the generic form will be uploaded with
each item and they will be hidden from the public.
- The identifier/folder name for each item is automatically entered into the title field.
Step 2: Introduction
- After the items have been uploaded, we’ll ask you to provide the names and e-mail addresses for each person at your institution that will be editing records.
- We will send invitations to each staff member to create editing accounts and give you an introduction to our system.
When you log into the system, you’ll see records that are blank except for the information that was on the super-template form. Here is what a blank record generated from the form above would look like:

To see a larger image, click here. (When the larger image opens, click on it to zoom.)
Step 3: Enter Information
- You will go into the system and enter all of the information for each item
Here is an example of a completed record from the same collection as the record above (note that some pre-set information was changed):

To see a larger image, click here. (When the larger image opens, click on it to zoom.)
Here is a second completed record with different kinds of information

To see a larger image, click here. (When the larger image opens, click on it to zoom.)
Step 4: Proof-Reading and Editing
- As you finish records, you will publish them so that they are visible to the public.
- Don’t forget to check your records for misspellings and mistakes.
- We ask that you let us know when you finish the first ten records so that we can make sure that the information is consistent with our guidelines.
